Web3 Payment Widget
Self-host and controll the entire payment flow within your app.
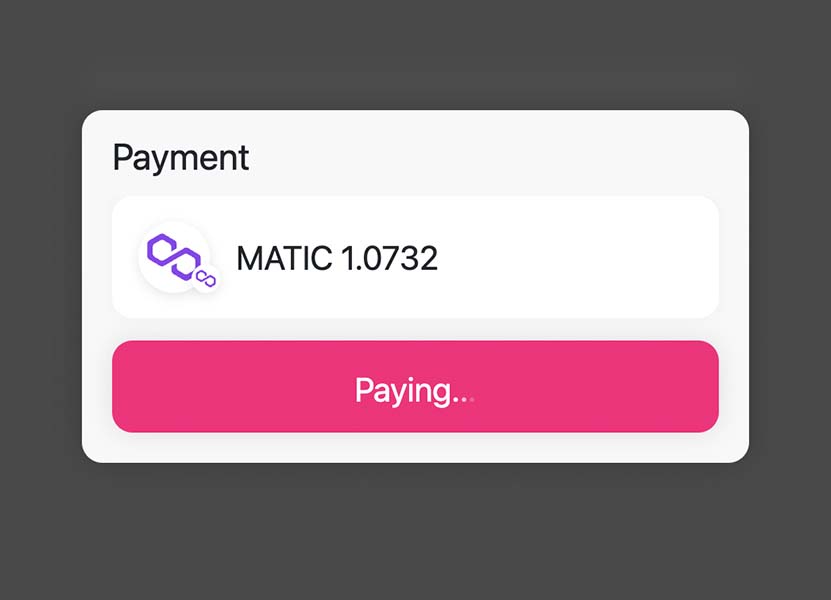
Example
Payment
Installation
Package
You can install DePay Widgets via yarn or npm and build it as part of your application:
yarn add @depay/widgets
or if you use npm
npm install @depay/widgets --save
Make sure you install DePay widgets peer dependencies, too, in case your project does not have them installed yet:
yarn add ethers react react-dom
npm install ethers react react-dom --save
CDN
If you don't want to install the package or don't want to build DePay Widgets as part of your application, you can also load DePay Widgets via our CDN:
<script defer async src="https://integrate.depay.com/widgets/v10.js"></script>
Usage
After installation, import DePayWidgets from @depay/widgets wherever you need it:
import DePayWidgets from '@depay/widgets';
Concepts
Learn about the 2 important steps for integrating the Web3 Payment Widget: Trace -> Tracking
Trace
A trace will be recorded right before the widget hands over the payment transaction to the user's wallet.
A trace makes sure that a payment will be tracked even if there is no further payment information submitted back to your app after signing a payment transaction.
If a trace is not submitted succesfully, the widget shows an error message and will not allow the user to submit the payment to prevent untracked payments.
Each trace needs to have its own secret_id.
Trace Example
A user selects USDC as a payment option, clicks "Pay", the trace is submitted to your app (without a transaction), and your app needs to make sure to forward the trace to the DePay API and it needs to respond with an HTTP success code (200) if creating the trace in the DePay API succeeded, otherwise it needs to reponds an error code (400-500) to the widget if creating the trace failed. Do NOT return the API body back to the widget!
If the user changes his mind after handing over to the wallet, e.g. cancels the transaction in his wallet prior to signing/submitting it and selects another payment option e.g. ETH a new trace will be submitted to your app, that new trace needs to have a new secret_id it can not have the previous trace secret_id
Tracking
As soon as the user's wallet reports the submitted transaction back to the payment widget it will report it to your app which will need to send it to the DePay API with the same secret_id of the foregone trace.
Make sure to also report back to the widget if tracking the payment via the DePay API succeeded (with a HTTP status code 200) or failed (with a HTTP status code 400-500). Do NOT return the API body back to the widget!
If the payment failed, ask the user to retry the payment. The payment flow will restart, starting with a new trace and a new secret_id.
Tracking Example
Continuing with the previous trace example, after the user chose USDC as a payment option, he clicks "Pay" the trace gets succesfully submitted and your app returns an HTTP 200 back to the widget. The widget now hands over the payment transaction to the wallet to sign & submit it. After the wallet submitted the transaction to the blockchain, it will share the transaction with the widget, which will send it to your app for tracking the payment. Make sure to submit the payment tracking including the transaction and the secret_id. The submitted secret_id needs to match the foregone trace's secret_id!
Make sure to responds with a HTTP status code 200 back to the widget if the payment tracking succeeded or with an HTTP status code 400-500 if it did not. Do NOT return the API body back to the widget!
Flow
Choose normal payment tracking if you want the user to wait for the payment to be fully validated before a release. Normal payment tracking allows users to immediately retry a payment if it failed.
Choose async payment tracking if you want to release the user ASAP and your user flow allows for asynchronous payment validation & confirmation. Async payment tracking DOES NOT allow users to immediately retry the payment if it failed. You would need to ask users to try to perform the payment again.
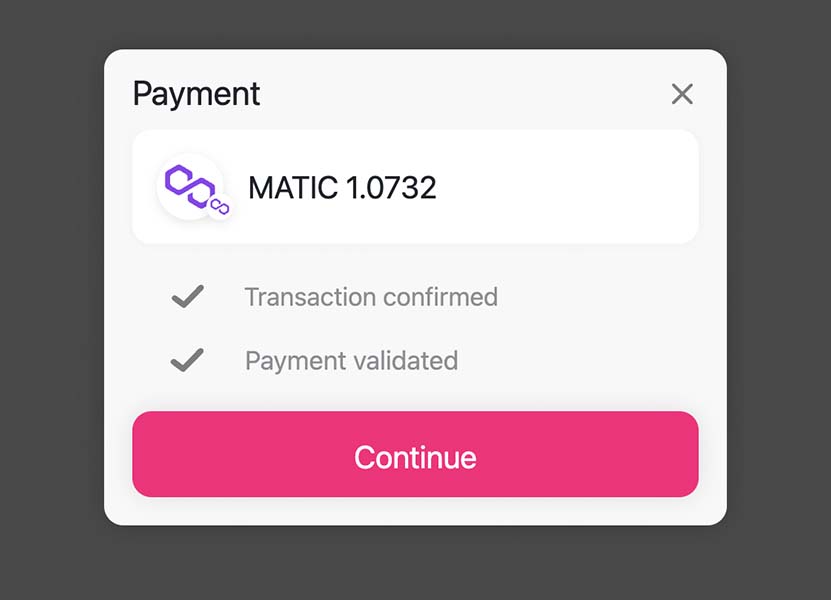
Normal Tracking
During normal payment tracking, users will need to wait until the payment has been validated before being released.
1. Transaction submitted (Normal Tracking)
2. Transaction succeeded (Normal Tracking)
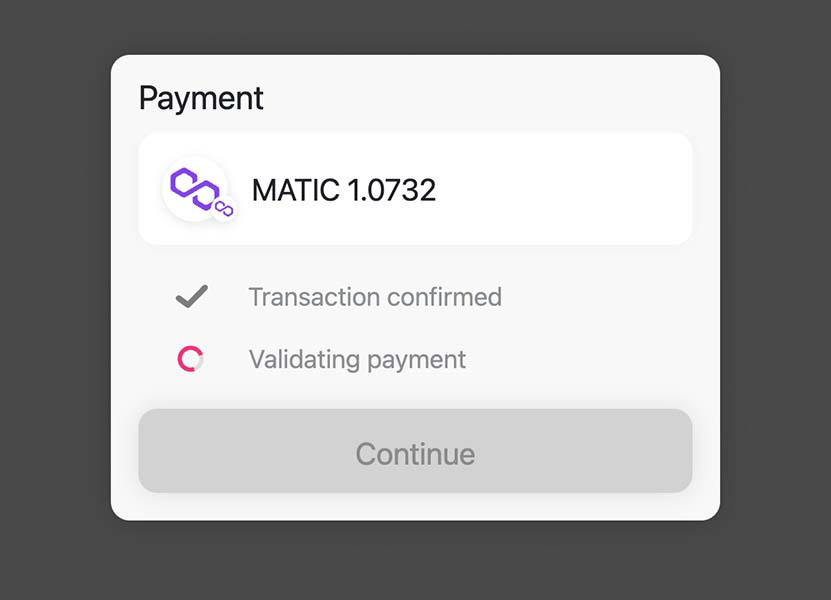
3. Payment validated (Normal Tracking)
Polling release
In normal tracking mode your app should integrate an endpoint to poll release status. See: polling
This ensures that the user is released even in scenarios where the connection between DePay APIs and the widget (websockets) fails.
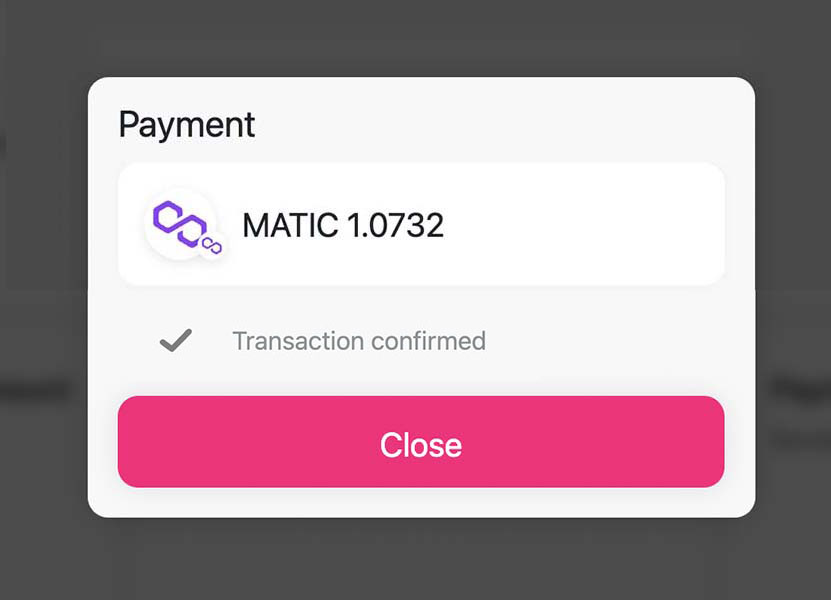
Async Tracking
During async payment tracking users will be released once the payment transaction has been confirmed once by the blockchain.
Payment validation is performed asynchronously and you can sent a payment confirmation asynchronously to the user (e.g. email, notifcation etc.).
1. Transaction submitted (Async Tracking)
2. Transaction confirmed (Async Tracking)
Without Tracking
Without payment tracking, users will be released immediately after the transaction has been confirmed by the blockchain.
No payment tracking nor validation is performed through DePay APIs.
Failed Payments
Failed payment transactions need to be retried. The widget prompts the user immediately to retry the transaction if it failed on the blockchain.
Failed Tracing
If tracing fails, the widget will NOT hand over the transaction to the user's wallet, instead it will show an error message and the user can not perform the payment:
![]()
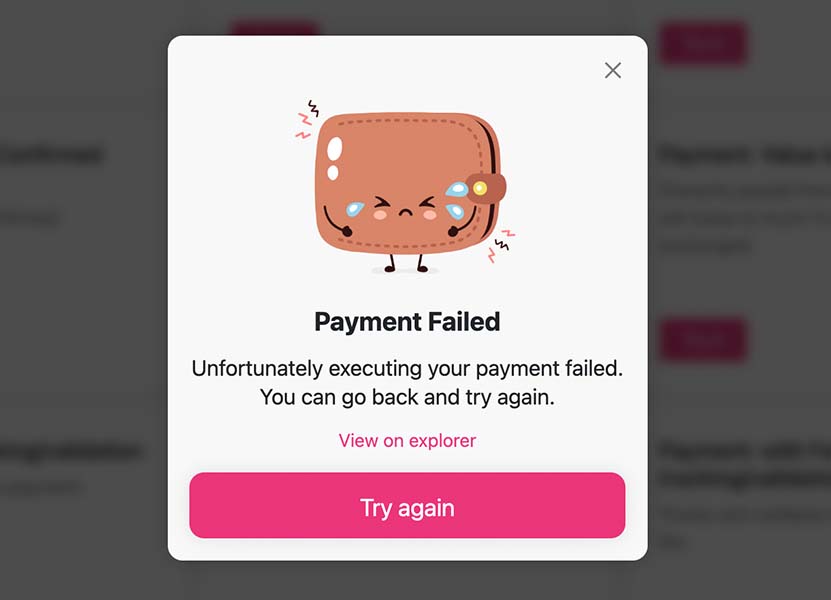
Failed Tracking
If tracking fails, after retrying every 3 seconds for 2 minutes (40 attempts), the widget will show the following error messages:
![]()
Users are not released if tracking fails (even in async tracking mode).
Configuration
You need to pass a configuration object to DePayWidgets.Payment which needs to at least contain the accept field.
DePayWidgets.Payment({

  accept: [{
    blockchain: 'ethereum',
    amount: 20,
    token: '0xa0bEd124a09ac2Bd941b10349d8d224fe3c955eb',
    receiver: '0x4e260bB2b25EC6F3A59B478fCDe5eD5B8D783B02'
  }]
});
This declares to accept 20 DEPAY tokens (0xa0bEd124a09ac2Bd941b10349d8d224fe3c955eb) as payment on ethereum to 0x4e260bB2b25EC6F3A59B478fCDe5eD5B8D783B02.
You can also accept multiple payments on multiple blockchains:
DePayWidgets.Payment({

  accept: [
    { // 20 USDT on ethereum
      blockchain: 'ethereum',
      amount: 20,
      token: '0xdac17f958d2ee523a2206206994597c13d831ec7',
      receiver: '0x4e260bB2b25EC6F3A59B478fCDe5eD5B8D783B02'
    },{ // 20 BUSD on bsc
      blockchain: 'bsc',
      amount: 20,
      token: '0xe9e7cea3dedca5984780bafc599bd69add087d56',
      receiver: '0x552C2a5a774CcaEeC036d41c983808E3c76477e6'
    }
  ]
});
The DePay App helps you to create a basic valid configuration: DePay App > Integrations > New Integration > Payment Widget
accept
The accept attribute describes what is accepted as a payment. It needs to be an array and needs to contain at least one entry.
Required Attributes
blockchain - The name of the blockchain (e.g. ethereum, bsc, polygon etc.)
token - The address of the token you want to receive
receiver - The address receiving the payment. Always double check that you've set the right address.
Optional Attributes
amount - The amount of tokens you want to receive. Needs to be passed as a human-readable number e.g. 20 or "20".
The BigNumber of that amount will be calculated internally including finding the right amount of decimals for the given token. Just pass the amount in a human readable form as Number/Decimal: e.g. 20 for 20 USDT or 20.25 etc.
If you do not pass an amount, the user will be able to select an amount within the widget.
track
Allows to track and validate payments via DePay APIs.
track: {
  endpoint: '/track/payments' // your endpoint to forward the payment tracking to the payments api
}
Once a user clicks "Pay" in the widget, and before the transaction is handed over to the wallet, the widget will send a payment trace (without transaction) to the configured endpoint.
This is where the payment tracing starts:
POST /track/payments
BODY:
  {
    "blockchain": "ethereum",
    "sender": "0x769794c94e9f113e357023dab73e81dbd6db201c",
    "nonce": "103",
    "after_block": "13230369",
    "to_token": "0xa0b86991c6218b36c1d19d4a2e9eb0ce3606eb48",
    "integration_id": "ef223b83-86c9-423f-9a0e-47a079d20f9d"
  }
If the endpoint does not confirm the receival (with 200) the widget will not hand over the transaction to the wallet.
Make sure to forward the payment trace to the DePay API.
Once the payment has been signed and submitted by the user wallet, the widget will call the configured endpoint to start the payment tracking.
This is where the payment tracking starts:
POST /track/payments
BODY:
  {
    "blockchain": "ethereum",
    "transaction": "0x4311a9820195c2a5af99c45c72c88848ed403a4020863c913feed81d15855ae4",
    "sender": "0x769794c94e9f113e357023dab73e81dbd6db201c",
    "nonce": "103",
    "after_block": "13230369",
    "to_token": "0xa0b86991c6218b36c1d19d4a2e9eb0ce3606eb48",
    "integration_id": "ef223b83-86c9-423f-9a0e-47a079d20f9d"
  }
Alternatively you can pass a method to track that performs the tracking request to your backend if you need to handle the request yourself (e.g. to add additional headers etc.):
track: {
  method: async (payment)=>{
    let response = await fetch('/track/payments', {
      method: 'POST',
      body: JSON.stringify(payment),
      headers: { "Content-Type": "application/json", "X-CSRF-TOKEN": document.querySelector('[name=csrf-token]').content }
    })
    if(response.status != 200) {
      throw 'TRACKING FAILED'
    }
  }
}
track: {
  method: (payment)=>axios('/track/payments', payment)
}
Make sure that your track->method throws an error in case the tracking request was not succesful. fetch does NOT throw an error if a request fails. e.g. axios does throw an error if a request fails.
Your endpoint needs to make sure to forward the payload of the tracking request to DePay's Payment Tracking API.
Also make sure to add token, amount, confirmation and receiver when forwarding the request to the Payment Tracking API.
Those values are supposed to be set by your backend not the widget nor the fronted because any user could set these values to their liking otherwise, having you confirm payment amounts and tokens that you didn't intend to receive!
Make sure you read the Payment Tracking API documentation for further details on how to integrate payment tracking.
Payment tracking requests will be attempted indefinitely. After 2 minutes a warning dialog will be presented to users asking them to ensure an internet connection so that the payment tracking request can be performed.
async
For user flows where you can release the user immediatelly, we recommend performing payment validation asynchronously as in certain situation in can take up to multiple minutes to validate a payment:
You can configure the widget to track/validate the payment asynchronously:
DePayWidgets.Payment({

  track: {
    endpoint: '/track',
    async: true
  }
})
Which will release the user right after the payment transaction has been confirmed on the user's machine.
It still tracks and validates the payment asynchronously (in the background) and calls back your endpoints as soon as it has been validated.
This allows you to release the user immediately, showing him some confirmation and reconfirming his payment in an asynchronous step (like a notification or email).
polling
In order to ensure a 100% coverage that users are released and forwarded within your payment flow, you will need to implement polling in addition to tracking.
The track.poll configuration either takes an enpoint or a method (similiar to track itself).
It will use the endpoint or the method to request a release every 5 seconds.
You need to make sure to respond to this request with a status 404 in case the user is not to be released just yet (payment and processing on your side are not complete yet)
or 200 if the payment has been completed and the processing on your side is done and the user can be released and forwarded withing your payment flow.
In case you want to redirect the user to the next step in your system, the poll endpoint needs to respond with a body containing json like: { forward_to: 'https://example.com/next_step_url' }.
It is not enough to rely on setting forward_to initially with the tracking request, you will also need to respond with forward_to when implementing polling
as the entire reason for polling is to cover cases where websockets fail and the initial forward_to can not be communicated to the client.
If you use a method for additional polling, make sure you return a promise. Polling will continue as long as you resolve this promise with anything that resolves to true:
track: {
  poll: {
    endpoint: '/payments/status'
  }
}
It will continously make the following request to your endpoint:
POST /payments/status
BODY:
  {
    "blockchain": "ethereum",
    "transaction": "0x4311a9820195c2a5af99c45c72c88848ed403a4020863c913feed81d15855ae4",
    "sender": "0x769794c94e9f113e357023dab73e81dbd6db201c",
    "nonce": "103",
    "after_block": "13230369",
    "to_token": "0xa0b86991c6218b36c1d19d4a2e9eb0ce3606eb48"
  }
Alternatively you can pass a method to poll that performs the tracking request to your backend if you need to handle the request yourself (e.g. to add additional headers etc.):
track: {
  poll: {
    method: async (payment)=>{
      let response = await fetch('/payments/123/release', {
        method: 'POST',
        body: JSON.stringify(payment),
        headers: { "Content-Type": "application/json", "X-CSRF-TOKEN": document.querySelector('[name=csrf-token]').content }
      })
      if(response.status == 200) {
        let json = await response.json()
        return json // { "forward_to": "https://mywebsite.com/payments/123/confirmation" }
      }
    }
  }
}
track: {
  poll: {
    method: async (payment)=>{
      let response = await axios('/payments/123/release', payment)
      return response // { "forward_to": "https://mywebsite.com/payments/123/confirmation" }
    }
  }
}
connected
A callback that will be executed once the user connects a wallet.
This function will be called with the connected wallet address as the main argument:
connected: (address)=> {
  // do something with the address
}
closed
closed
A function that will be called once the user closes the widget (no matter if before or after the payment).
closed: ()=> {
  // do something if user closed the widget
}
before
before
A function that will be called before the payment is handed over to the wallet.
Allows you to stop the payment if this methods returns false.
before: (payment)=> {
  alert('Something went wrong')
  return false // stops payment
}
sent
sent
A function that will be called once the payment has been sent to the network (but still needs to be mined/confirmed).
The widget will call this function with a transaction as single argument (see: depay-web3-wallets for more details about the structure)
sent: (transaction)=> {
  // called when payment transaction has been sent to the network
}
succeeded
succeeded
A function that will be called once the payment has succeeded on the network (checked client-side).
The widget will call this function passing a transaction as single argument (see: depay-web3-wallets for more details)
succeeded: (transaction)=> {
  // called when payment transaction has been confirmed once by the network
}
validated
validated
A function that will be called once the payment has been validated by DePay Apis (server-side).
validated: (successful)=> {
  // successful (true or false)
}
failed
failed
A function that will be called if the payment execution failed on the blockchain (after it has been sent/submitted).
The widget will call this function passing a transaction as single argument (see: depay-web3-wallets for more details)
failed: (transaction)=> {
  // called when payment transaction failed on the blockchain
  // handled by the widget, no need to display anything
}
critical
critical
A function that will be called if the widget throws an critical internal error that it can't handle and display on it's own:
critical: (error)=> {
  // render and display the error with error.toString()
}
error
error
A function that will be called if the widget throws an non-critical internal error that it can and will handle and display on it's own:
error: (error)=> {
  // maybe do some internal tracking with error.toString()
  // no need to display anything as widget takes care of displaying the error
}
currency
Allows you to enforce displayed local currency (instead of automatically detecting it):
{
  currency: 'USD'
}
whitelist
Allows only the configured tokens to be eligible as means of payment (from the sender):
whitelist: {
  ethereum: [
    '0xEeeeeEeeeEeEeeEeEeEeeEEEeeeeEeeeeeeeEEeE', // ETH
    '0xdac17f958d2ee523a2206206994597c13d831ec7', // USDT
    '0x6b175474e89094c44da98b954eedeac495271d0f'  // DAI
  ],
  bsc: [
    '0xEeeeeEeeeEeEeeEeEeEeeEEEeeeeEeeeeeeeEEeE', // BNB
    '0xe9e7cea3dedca5984780bafc599bd69add087d56', // BUSD
    '0x55d398326f99059ff775485246999027b3197955'  // BSC-USD
  ],
  polygon: [
    '0xEeeeeEeeeEeEeeEeEeEeeEEEeeeeEeeeeeeeEEeE', // MATIC
    '0x2791bca1f2de4661ed88a30c99a7a9449aa84174', // USDC
  ]
}
blacklist
Allows to blacklist tokens so that they will not be suggested as means of payment (from the sender):
blacklist: {
  ethereum: [
    '0x82dfDB2ec1aa6003Ed4aCBa663403D7c2127Ff67',  // akSwap
    '0x1368452Bfb5Cd127971C8DE22C58fBE89D35A6BF',  // JNTR/e
    '0xC12D1c73eE7DC3615BA4e37E4ABFdbDDFA38907E',  // KICK
  ],
  bsc: [
    '0x119e2ad8f0c85c6f61afdf0df69693028cdc10be', // Zepe
    '0xb0557906c617f0048a700758606f64b33d0c41a6', // Zepe
    '0x5190b01965b6e3d786706fd4a999978626c19880', // TheEver
    '0x68d1569d1a6968f194b4d93f8d0b416c123a599f', // AABek
    '0xa2295477a3433f1d06ba349cde9f89a8b24e7f8d', // AAX
    '0xbc6675de91e3da8eac51293ecb87c359019621cf', // AIR
    '0x5558447b06867ffebd87dd63426d61c868c45904', // BNBW
    '0x569b2cf0b745ef7fad04e8ae226251814b3395f9', // BSCTOKEN
    '0x373233a38ae21cf0c4f9de11570e7d5aa6824a1e', // ALPACA
    '0x7269163f2b060fb90101f58cf724737a2759f0bb', // PUPDOGE
    '0xb16600c510b0f323dee2cb212924d90e58864421', // FLUX
    '0x2df0b14ee90671021b016dab59f2300fb08681fa', // SAFEMOON.is
    '0xd22202d23fe7de9e3dbe11a2a88f42f4cb9507cf', // MNEB
    '0xfc646d0b564bf191b3d3adf2b620a792e485e6da', // PIZA
    '0xa58950f05fea2277d2608748412bf9f802ea4901', // WSG
    '0x12e34cdf6a031a10fe241864c32fb03a4fdad739' // FREE
  ]
}
event
If set to ifSwapped, emits a payment event if payments are routed through router smart contract.
Payments are routed through the DePayPaymentRouter if swapping tokens is required in order to perform the payment. If payments are not routed through the router, e.g. direct transfer, no event is emited if event is set to ifSwapped.
{
  event: 'ifSwapped'
}
container
Allows you to pass a container element that is supposed to contain the widget:
{
  container: document.getElementById('my-container')
}
Make sure to set the css value position: relative; for the container element. Otherwise it can not contain the widget.
React example:
let CustomComponentWithWidget = (props)=>{
  let container = useRef()

  useEffect(()=>{
    if(container.current) {
      DePayWidgets.Payment({ ...defaultArguments, document,
        container: container.current
      })
    }
  }, [container])

  return(
    <div ref={container} style={{ position: 'relative', border: '1px solid black', width: "600px", height: "600px" }}></div>
  )
}
style
Allows you to change the style of the widget.
{
  style: {
    colors: {
      primary: '#ffd265',
      text: '#e1b64a',
      buttonText: '#000000',
      icons: '#ffd265'
    },
    fontFamily: '"Cardo", serif !important',
    css: `
      @import url("https://fonts.googleapis.com/css2?family=Cardo:wght@400;700&display=swap");

      .ReactDialogBackground {
        background: rgba(0,0,0,0.8);
      }
    `
  }
}
recover
Allows you to recover a previous made payment. E.g. useful if you need to continue to show a pending payment progress if user rearrives or reloads a page:
{
  recover: {
    blockchain: 'ethereum',
    transaction: '0x081ae81229b2c7df586835e9e4c16aa89f8a15dc118fac31b7521477c53ed2a9',
    sender: '0x317d875ca3b9f8d14f960486c0d1d1913be74e90',
    nonce: 2865,
    afterBlock: 14088130,
    token: '0xEeeeeEeeeEeEeeEeEeEeeEEEeeeeEeeeeeeeEEeE',
    amount: 0.0001
  }
}
fee
You can configure a fee which will be applied to every payment with it's own dedicated fee receiver address.
The fee will be taken from the target token and target amount (after swap, depending on your accept configuration).
amount: Either percentage (e.g. 5%, or absolute amount as BigNumber string ('100000000000000000') or pure number (2.5)
receiver: The address that is supposed to receive the fee.
{
  fee: {
    amount: '3%',
    receiver: '0x4e260bB2b25EC6F3A59B478fCDe5eD5B8D783B02'
  }
}
Unmount
Allows you to unmount (the React safe way) the entire widget from the outside:
let { unmount } = await DePayWidgets.Payment({})

unmount()
Preload
To optimize initialization speed of the Payment Widget you can preload payment routes as soon as you become aware of the users wallet address.
Typically right after the users conncets his wallet, or in cases the user has his wallet already connected you can preload immediately:
let address = '0x4aD374e0836c26BeC213a19D3e030F8b3A8AcDE4' // e.g. retrieve it right when you perform wallet connect
DePayWidgets.Payment.preload({
  account: address,
  accept: [
    {
      blockchain: 'ethereum',
      amount: 10,
      token: '0xa0bEd124a09ac2Bd941b10349d8d224fe3c955eb',
      receiver: '0x4e260bB2b25EC6F3A59B478fCDe5eD5B8D783B02'
    },{
      blockchain: 'bsc',
      amount: 10,
      token: '0xa0bEd124a09ac2Bd941b10349d8d224fe3c955eb',
      receiver: '0x4e260bB2b25EC6F3A59B478fCDe5eD5B8D783B02'
    }
  ]
});